A sharp, professional-looking paint job is more than color choice — it’s about the edges. Crisp lines where wall meets trim, ceiling, and baseboard make a room read as intentionally finished. For homeowners seeking trusted, reliable results, especially those arranging Home Interior Painting In Bellingham WA, understanding the methods pro painters use will help you get top-rated results and avoid costly touch-ups. This guide breaks down the tools, prep, and proven techniques painters rely on to get clean lines every time.
Why crisp edges matterCrisp edges aren’t only aesthetic. They give a space a high-performance, finished appearance and make paint jobs last longer by preventing wear at vulnerable joins. On interior projects, tidy lines around windows, doors, and crown molding make paint transitions look intentional — that’s the difference between an amateur job and a results-driven finish.
Essential tools and materialsYou don’t need exotic gear — you need the right quality tools and to use them the right way.
Angled sash brush (2–2.5 in. for most work)
High-quality roller (3/8" nap for smooth walls, 1/2" for light texture)
Painter’s tape (use the correct grade for delicate or textured surfaces)
Paint edger (handheld or pad edger)
Putty knife / credit-card tool (for smoothing tape edges and scraping)
Paintable caulk and a caulk gun
Sandpaper (120–220 grit) and sanding block
Primer appropriate to the substrate
Drop cloths and tack cloths for dust control
Good lighting (portable LED work lights)
Use reputable, well-experienced brands if you want predictable performance; cheap tools increase the chance of ragged edges.
Preparation: the part pros never skipClean, prep, and plan. Paint can’t perform miracles if the surface isn’t ready.
Clean the surface: Remove dust, oils, and grime. Use a mild detergent and let surfaces dry completely.
Sand and fill: Smooth rough spots and fill nail holes; sand edges lightly to create a sound substrate.
Prime where needed: Bare wood, patched areas, or strong stains should be primed. Primer creates an even base for crisp lines.
Caulk gaps: Run a thin bead of paintable caulk where trim meets wall to seal gaps. Tool the bead smooth; once painted, it hides minor irregularities and creates a crisp transition.
Control environment: Bellingham’s marine-influenced climate can raise humidity; schedule interior painting when relative humidity is moderate and temperatures are within the paint manufacturer’s recommendations so paint films form consistently.
Pro techniques painters use to get razor-sharp edgesBelow are the concrete tricks professionals use, with notes on when each is best.
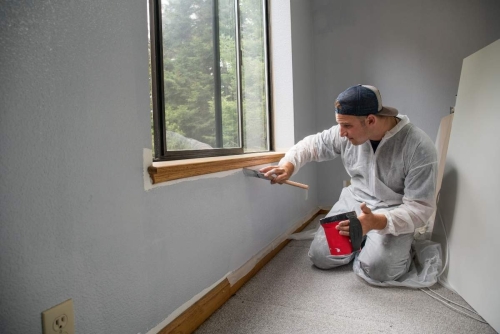
1. “Cutting in” with an angled sash brush — master the wristCutting in = painting the narrow strip between trim/ceiling and wall. Pros use a high-quality angled sash brush, load it correctly (not overloaded), and hold it at a consistent angle. Move the brush with a steady hand, using short, controlled strokes rather than long arm swings. Practice the motion on scrap wood to gain confidence.
2. The tape + seal technique (tape smart, then seal)Painter’s tape works — but only if applied correctly.
Press tape down firmly; use a putty knife to seal the edge.
For the sharpest line, first paint the tape edge with the wall color (or a sliver of clear primer) to seal the tape. Let it dry, then paint the trim color. If any paint bleeds under the tape, it will be the wall color and will be covered by the trim coat.
Alternative: run a tiny bead of clear, paintable silicone or acrylic caulk under the tape edge and smooth it; this fills gaps and prevents bleed.
3. Paint the low side first (trim-first vs. wall-first)There are two standard approaches:
Trim-first: Paint trim and mouldings first, remove any stray trim paint from the wall, then roll the wall up to the trim for a tight join. This is ideal for high-gloss trim because you can cut in carefully and quickly roll the wall.
Wall-first: Paint the wall first, then cut in the trim. This can be faster when coverings are extensive.
Pros select the route based on sheen and the homeowner’s priorities; both can produce crisp edges if executed well.
4. The “wrap” and “feather” methodWhen cutting in, painters leave a narrow strip of the adjacent surface unpainted by the roller, then use a brush to “wrap” the cut-in paint slightly into the roller area. Immediately rolling the wall with a loaded roller that slightly overlaps the cut-in area blends brush and roller marks, creating an invisible seam.
5. Use a high-quality edger tool for long runsFor long, straight runs (e.g., baseboards), a hand edger or specialty tool can speed work and keep lines straight. The key is to avoid pressing so hard that the edger squeezes paint out — keep steady pressure.
6. Remove tape at the right moment and the right angleRemove tape while paint is still slightly tacky or immediately after the topcoat dries to the touch. Pull the tape back at a 45-degree angle, away from the painted edge. If you wait until paint cures fully, you risk peeling the edge.
7. Thin paint slightly and use flow additives when neededA paint that’s too thick will drag and show brush strokes at the edge. For certain finishes and climates, pros thin paint according to manufacturer guidelines or use a paint conditioner to improve flow, especially for brushwork on trim.
8. Choose the right brush hair and widthNatural (sable) or high-quality synthetic blend brushes for water-based paints deliver a smoother edge than bargain brushes. Size matters: 2–2.5 inches is the sweet spot for most interior trim work.
9. Light and sight lines — position mattersSet up lighting to cast a soft shadow along the edge you’re cutting in. Good lighting reveals dips and ridges so you can correct them as you go.
10. Fix mistakes immediately with a wet edgeIf a stray line appears, clean it quickly with a damp cloth if paint is wet. If dry, lightly sand and touch up. Pros also sometimes use a razor or utility knife to cut a peel and then feather in paint for an invisible repair.
Common mistakes to avoidUsing cheap tape on textured or delicate surfaces.
Overloading the brush.
Waiting too long to remove tape.
Skipping caulk or primer where needed.
Painting in high humidity without adjusting expectations.
Case study — composite example from Bellingham interiorsProject: Interior refresh for a 1920s bungalow in central Bellingham.
Scope: Full living room and hallway — repaint walls, ceilings, and trim (baseboards, window casings). Homeowner wanted a clean, modern look while preserving original wood trim details.
What the painters did (pro workflow):
Cleaned and prepped surfaces; sanded and primed patched areas.
Filled gaps between trim and plaster with a thin bead of paintable caulk. Tooling the caulk ensured a smooth joint.
Cut in trim first with a 2.5" angled sash brush using a high-gloss enamel for durability. After the trim coat dried to the touch, they lightly sanded to knock down any tiny fuzzy spots.
Used the “paint the tape” sealing trick on tricky window reveals; pressed tape down with a putty knife, sealed with thin primer, then applied wall color.
Rolled walls with a 3/8" nap roller, feathering into the cut-in edges to blend brush strokes.
Removed tape at 45 degrees while paint was tacky.
Result: Clean, museum-quality lines. Homeowner reported the trim looks professionally restored and the overall finish reads higher-end. This composite demonstrates how combining caulk, the tape-seal technique, and careful cutting-in creates crisp edges that last.
Checklist for homeowners booking Home Interior Painting In Bellingham WAConfirm whether the contractor plans trim-first or wall-first and why.
Ask what tape and caulk they’ll use — trust matters; pick contractors who use proven materials.
Request a walkthrough to identify problem areas (dents, old paint adhesion, stains).
Plan for controlled humidity conditions during the job if possible.
Ask about touch-up policy for edges — a reliable, results-driven contractor will stand by their work.
FAQsQ: Is painter’s tape always necessary to get crisp edges?
A: Not always. Experienced painters can cut in freehand with a sash brush to get razor edges. Tape is helpful for DIYers or on very irregular surfaces. If using tape, pick the right grade and seal the edge.
Q: Should I paint trim before walls for the best edges?
A: Both approaches work. Trim-first allows careful trim finishing with fewer interruptions; wall-first can be faster for large areas. Discuss with your contractor which fits the project.
Q: How long should I wait to remove tape?
A: Remove tape while the topcoat is still slightly tacky or shortly after it becomes dry to the touch. Pull back at a 45-degree angle.
Q: Can humidity in Bellingham affect edge quality?
A: Yes. High humidity slows drying and can lead to more bleeding under tape or slower film formation. Pros adjust working methods and timing when humidity is high.
Q: How do painters fix small bleeds after removing tape?
A: Usually by first sanding the bleed area lightly and then applying a precise touch-up with a small brush. If bleed is minimal, a light touch-up often disappears once topcoat is applied.
Crisp, clean edges are the hallmark of a professional interior paint job. For homeowners arranging Home Interior Painting In Bellingham WA, the difference comes down to preparation, the right tools, and a handful of pro techniques: careful cutting-in, smart use of tape and caulk, rolling strategy, and disciplined tape removal. Whether you tackle the job yourself or hire a trusted, top-rated contractor like Next Step Painting LLC, following these proven methods ensures your walls, trim, and ceilings have a sharp, long-lasting finish that elevates the entire home.