Home improvement projects can be both exciting and challenging, with tile floor removal ranking among the more complex tasks homeowners might encounter. Whether you're planning to update your space with new flooring or addressing damaged tiles, the removal process requires careful planning and execution.
The success of your tile removal project depends heavily on understanding the proper methods and having the right tools at your disposal. Proper preparation, safety considerations, and attention to the underlying surface all play vital roles in achieving professional-quality results.
Assessment and PreparationStarting a tile removal project requires careful evaluation of your existing floor. Take time to inspect the entire area, focusing on loose or damaged tiles. Understanding your tile type - whether ceramic, porcelain, or natural stone - helps determine the most effective removal approach.
Essential Tools and MaterialsHaving the right equipment ready before you start makes a significant difference:
Safety gear: glasses, work gloves, and dust mask
Hand tools: putty knives, chisels, and hammers
Power tools for larger areas
Debris containers and dust sheets
Workspace PreparationStart by removing all furniture and covering fixtures, vents, and doorways with plastic sheeting to contain dust. For kitchen or bathroom projects, ensure all water sources are shut off and appliances are disconnected. Maintain proper ventilation, but be strategic about airflow to minimize dust spread.
Before tackling the entire floor, test your removal technique on a small area. This helps you understand how the tiles and adhesive will respond and allows you to adjust your approach if needed.
Essential Safety MeasuresTile removal creates significant amounts of dust and debris, making safety precautions non-negotiable. Professional contractors prioritize three key areas: personal protection, dust management, and workspace safety.
Personal Protective Equipment RequirementsYour body's most vulnerable areas need proper protection during tile removal. High-quality safety glasses shield your eyes from flying chips and dust particles. A NIOSH-rated dust mask or respirator prevents inhalation of harmful particles. Thick work gloves protect your hands not just from sharp edges, but also from prolonged vibration when using power tools.
Advanced Dust Control StrategiesCreating an effective dust containment system makes a dramatic difference in your post-project cleanup. Set up plastic barriers at doorways using zippered entrances for access. Place box fans in windows, pointing outward, to create negative air pressure that keeps dust from spreading to other rooms.
Workspace Safety ProtocolSafety extends beyond personal equipment - it's about creating a secure environment. Some essential practices include:
Marking and covering all electrical outlets in the work area
Using GFCI protection for all power tools
Keeping a first aid kit and phone easily accessible
Maintaining clear pathways for moving through the workspace
Physical Wellbeing During RemovalRemember to take regular breaks during the removal process. Tile removal is physically demanding work, and fatigue can lead to mistakes or accidents. Stay hydrated and pace yourself throughout the project.
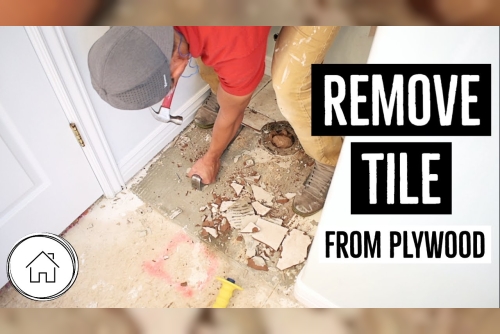
Professional Removal TechniquesThe success of your tile removal project largely depends on selecting the right removal method for your specific situation. Professional contractors typically employ a combination of manual and powered techniques depending on the tile type and installation method.
Manual Removal MethodsStarting with hand tools offers precise control in delicate areas. A chisel and hammer combination works effectively for initial tile breaking, while a pry bar helps lift loosened pieces. This approach proves particularly useful around fixtures and corners where powered tools might cause damage.
Power Tool ApplicationsA professional floor tile remover dramatically increases efficiency for larger areas. Rotary hammers with specialized attachments break up tiles quickly while minimizing subfloor damage. For particularly stubborn installations, oscillating tools help cut through tough adhesive and grout lines.
Strategic Removal PatternsRather than random removal, work in strategic sections:
Start from a doorway or room edge
Remove tiles in a consistent direction
Maintain a clear path for debris removal
Work in manageable 3x3 foot sections
Specialized Techniques for Different TilesPorcelain tiles require more force and specialized tools compared to ceramic ones. Natural stone demands extra care to prevent breakage that could damage the subfloor. Each material benefits from specific blade types and removal angles for optimal results.
Post-Removal ProcessAfter you successfully remove floor tile, several crucial steps ensure your subfloor is ready for new flooring installation. This phase requires attention to detail and patience to achieve professional results.
Surface Preparation EssentialsThe initial challenge lies in removing residual adhesive and grout. Electric grinders with diamond cup wheels efficiently clean larger areas, while hand scrapers work best for corners and edges. Keep the surface as level as possible during this process to prevent issues with new flooring installation.
Subfloor AssessmentLook for these critical issues after cleaning:
Moisture damage or water stains
Cracks or structural weaknesses
Uneven areas requiring leveling
Signs of mold or mildew
Professional Restoration MethodsApplying a quality sealer helps protect exposed concrete or wood subfloors from moisture damage. For areas requiring repair, use appropriate patching compounds that match your subfloor material. Allow sufficient drying time between applications to ensure proper curing.
Final Surface InspectionTest the floor's level using a long straight edge or level. Pay special attention to high-traffic areas and transitions between rooms. Any variations greater than 1/8 inch over 10 feet require additional leveling before new flooring installation.
Professional Tips and Time-Saving MethodsHigh-Efficiency Removal StrategiesProfessional contractors maximize efficiency by working systematically. Start with loose tiles to understand the adhesive pattern. Use wide-blade tools to remove multiple tiles simultaneously when possible. Keep your workspace organized with designated areas for tools and debris collection.
Common Challenges and SolutionsHeat exposure weakens most adhesives, making tile removal easier on warm days. For stubborn areas, professionals often use infrared heat tools to soften the bonding material. When dealing with corners and edges, score the grout lines first to prevent wall damage.
Time-Saving Equipment SelectionThe right tool combination speeds up your project:
Multi-head removal tools for large, open spaces
Compact scrapers for detailed edge work
Dust collection systems that attach directly to power tools
Automated grout removal tools for faster preparation
Professional Project PlanningCalculate additional time for unexpected challenges like damaged subfloors or hidden moisture issues. Schedule longer sessions when possible, as frequent starts and stops reduce efficiency. Consider factors like room accessibility and debris removal paths when planning your approach.
Final ThoughtsSuccessful tile removal requires careful planning, proper safety measures, and the right combination of tools and techniques. While DIY removal is possible, the complexity of the task often warrants professional attention to prevent costly mistakes and ensure proper preparation for new flooring installation.
“Tear It Up!” Floor Removal delivers expert tile removal services across the metropolitan area. Residents trust our proven track record of efficient project completion and meticulous attention to subfloor preparation. Contact us for detailed project assessment and competitive pricing.
Frequently Asked QuestionsHow much does professional tile removal typically cost per square foot?Professional tile removal costs typically range from $3 to $7 per square foot, varying based on your location, tile type, and installation method. Additional fees may apply for subfloor repairs or disposal services.
Can I install new tiles directly over the existing floor adhesive?No, installing new tiles over old adhesive can lead to uneven surfaces and poor bonding. Complete adhesive removal is essential for proper new tile installation and longevity.
How long should I wait after tile removal before installing new flooring?Allow 24-48 hours after completing subfloor repairs and applying sealants before installing new flooring. This waiting period ensures proper curing of any patching compounds or moisture barriers.
What's the best season for tile removal projects?Spring and fall are ideal for tile removal projects due to moderate temperatures and humidity levels. These conditions help prevent moisture-related issues and allow proper curing of repair materials.